Sushi Making Basics with Loaded California Rolls & Tempura Rolls

I was first introduced to sushi when I was in high school by a Japanese exchange student. She was so homesick and missing her favorite foods, so I took her to Uwajimaya, a large Japanese grocery store, in Beaverton, Oregon. She was so happy because everything was familiar and she could purchase some of her favorite food items. At that time, the store had a sushi restaurant connected to it, so we decided to go to lunch.

I had never had sushi before and my knowledge of Japanese food extended to yakisoba noodles and teriyaki chicken, so I was excited to try something new. Needless to say, I was hooked and have been a huge fan of Japanese food ever since.

One day about twenty years ago, I decided that it would be fun to make sushi at home. Way back then, we did not have YouTube tutorials and access to online recipes like we do today, so you had to read everything in a book, use your imagination, and hope it turned out okay. Needless to say, I gave it my best effort and it turned out okay.


Making group sushi is something I plan on doing again as it is fun to experiment with ingredients and entertaining for everyone involved. I think this would even be something you could do with younger children who enjoy sushi. We also made some variations with fried shrimp, sashimi (raw fish), and a deep fried tempura roll (see picture below). However you make your sushi it will be delicious!
2 cups Japanese short or medium grain rice
2 1/2 cups cold water
5 Tbsp Sushi Vinegar (see recipe below)


1. Wash the rice with cold water until the water runs clear.


5. Once you hear a faint hissing sound, reduce the heat to very low and cook another 6 min.
7. Transfer the hot rice to a large baking sheet with high sides and break it up to get rid of all the clumps.

8. Add your ingredients for the sushi vinegar to a small pan and cook over medium high until salt and sugar are dissolved. Set aside to cool for 5-10 minutes.

Assembling your California Rolls:

3. Spread a generous handful of sushi rice onto the 1/2 sheet of nori. If you want bigger rolls, use a whole sheet of nori. Keep a small bowl of water near to dip your fingers in to keep the rice from sticking to your hands.

5. Press the rice down firmly onto the nori. Now flip the rice covered piece of nori over so the rice is facing down against the plastic wrap. You will now be looking at the nori without rice on it (this way, your rice will be on the outside). The rice will stay in place...dont worry. Place your fillings across the center of your rice in the middle of the sheet (don't overfill or the roll won't seal). We make our sushi a little bit bigger than the small size you see in the restaurant, so we use a whole sheet.
2 1/2 cups cold water
5 Tbsp Sushi Vinegar (see recipe below)
Sushi Vinegar:
4 Tbsp Rice vinegar
2 Tbsp sugar
2 tsp salt I used sea salt
Ingredients for California Rolls (*optional ingredients):
2 Tbsp sugar
2 tsp salt I used sea salt
Ingredients for California Rolls (*optional ingredients):
1/2 lb Imitation crab meat sticks (Kanikama in Japanese)
1 Avocado ripe but still firm
1 Avocado ripe but still firm
*1 cup of imitation crab salad-lump imitation crab mixed with mayo to taste (make ahead)
1/2 medium cucumber peeled and sliced into long matchsticks (prep ahead)
Toasted Nori Seaweed
1/2 medium cucumber peeled and sliced into long matchsticks (prep ahead)
Toasted Nori Seaweed
Cream cheese
*Tobiko-optional (It’s a popular ingredient as a garnish to sushi rolls and sold at most Japanese stores)
A sushi rolling mat-between $1.50-2.00 at Asian stores
Don't get overwhelmed by the Japanese ingredients..keep it simple. You can even by premade crab salad from your grocery store to simplify. If you cannot find the imitation crab leg sticks, you can also use the chunks. You've got this...keep going!


Sides/Dips/Sauces:
Soy sauce regular or low sodium
Wasabi paste or wasabi powder
For spicy mayo: Mayonnaise ~1 Tbsp and Sriracha hot chili sauce (~1 tsp) or to taste
Soy sauce regular or low sodium
Wasabi paste or wasabi powder
For spicy mayo: Mayonnaise ~1 Tbsp and Sriracha hot chili sauce (~1 tsp) or to taste
Pickled ginger (comes in shades of pink or white)
Instructions:
How to Cook Perfect Sushi Rice (Rice Maker and Stove-top versions)
Instructions:
How to Cook Perfect Sushi Rice (Rice Maker and Stove-top versions)

p.s. I highly recommend if you eat a lot of rice in your home to invest in a good quality rice cooker...it is so much easier and you will have perfect rice every time! I use sushi rice for my recipe, but you can use whatever rice you have at home. Sushi rice has a specific texture that makes it stick together for rolls. You can find sushi rice at most Asian grocery stores and at some of the larger chain grocery stores. Like I said, you can use whatever rice you have...it will be perfect!
1. Wash the rice with cold water until the water runs clear.


2. Drain well. If you have a rice maker, follow rice maker instructions and then skip to step #7.

3. Put drained rice in a heavy saucepan and add 2 cups cold water. Cover tightly and set the pan over high heat and bring to a boil.
4. Once it boils, reduce heat to medium and let cook covered until all the water is absorbed (7-8 min). Do not remove the cover to check, but listen for the bubbling to stop.
5. Once you hear a faint hissing sound, reduce the heat to very low and cook another 6 min.
6. Remove from the heat and let stand 15 min covered.
7. Transfer the hot rice to a large baking sheet with high sides and break it up to get rid of all the clumps.

8. Add your ingredients for the sushi vinegar to a small pan and cook over medium high until salt and sugar are dissolved. Set aside to cool for 5-10 minutes.
9. Let the rice cool down until it is just warm, then stir in your cooled sushi vinegar. Fan your rice as you mix in the vinegar. Cover with plastic wrap to keep warm. You have now made it through the hardest part of all of this. Once you have made the rice you are in the home stretch...keep going!

Assembling your California Rolls:
1. Wrap your sushi matt in plastic wrap before using it. This will help to keep it clean.

2. Fold the pieces of nori in half and cut with kitchen shears or scissors.
3. Spread a generous handful of sushi rice onto the 1/2 sheet of nori. If you want bigger rolls, use a whole sheet of nori. Keep a small bowl of water near to dip your fingers in to keep the rice from sticking to your hands.
4. Lightly sprinkle rice with Tobiko if you wish. You can also use toasted sesame seeds, but we prefer the flavor and texture of the Tobiko.

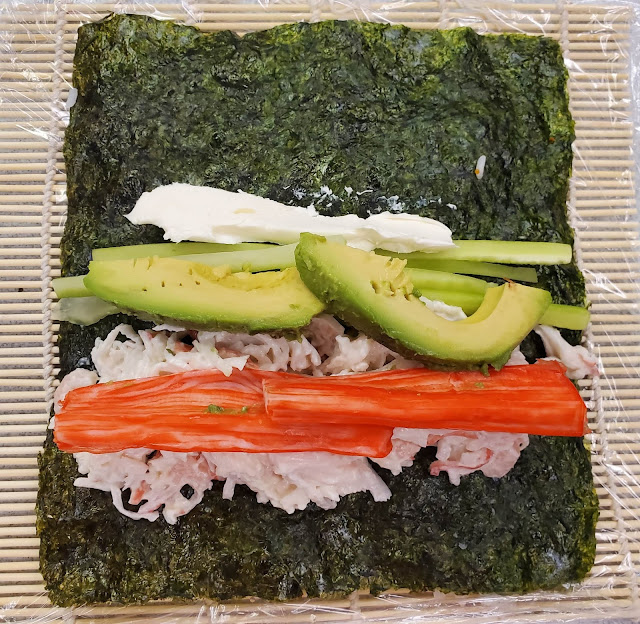
5. Press the rice down firmly onto the nori. Now flip the rice covered piece of nori over so the rice is facing down against the plastic wrap. You will now be looking at the nori without rice on it (this way, your rice will be on the outside). The rice will stay in place...dont worry. Place your fillings across the center of your rice in the middle of the sheet (don't overfill or the roll won't seal). We make our sushi a little bit bigger than the small size you see in the restaurant, so we use a whole sheet.

The rice is now on the bottom against the plastic. Here we added crab salad, imitation crab stick (kanikama), cucumbers, avocado, and cream cheese.
6. Start rolling away from you using your matt to firmly keep the roll in place. Apply some pressure to make a tight roll. If its not tight enough, it will be difficult to cut. Use the bamboo map to shape the roll. The mat is not actually used to roll the sushi, but to shape it at the very beginning and the very end before unwrapping it.
7. Using a very sharp knife, cut the roll in half, then line the two halves up and slice even 1- 1 1/2 inch rings. Oh my gosh...you did it! You just made your first amazingly delicious sushi. Yay!
8. Serve with pickled ginger, wasabi, soy sauce, or spicy mayo depending on your taste. Enjoy!
Variations:
Tempura Sushi
Tempura batter:
1/2 cup all-purpose flour1/2 cup cornstarch1 tsp kosher salt1 large egg, whisked3/4 cup seltzer water
Additional ingredients:
Panko bread crumbs
Gallon size ziptop bag
medium size heavy bottom pot for frying
3-4 cups of oil
Mix batter and let set for a five minutes. When rolling your sushi roll, do not flip your nori sheet with rice on it. The rice must be on the inside for a tempura roll. Make your rolls and cut in half. A whole roll will be too difficult to fry.
Heat oil in heavy bottom pot to 325-250.

Dip your rolls 1-2 pieces at a time in the batter. Allow excess to drip off and dip in a zipbag with Panko bread crumbs.

Close the top of the bag and shake your two rolls until coated.
Add carefully place these breaded sushi in the oil and fry until lightly browned.


Remove from oil and place on a paper towel lined plate. Continue coating, breading, and frying any additional pieces. Using a very sharp knife, cut each section into three equal pieces. Serve with your favorite sauces, pickled ginger, or wasabi.
